
Wix gives you exactly one export button, and it only covers your 20 most recent blog posts. Everything else, your pages, your images, your store and your design, stays locked inside the Wix editor. That single fact defines how to switch from Wix to WordPress. The move is part export and part rebuild, and the order you do it in decides whether you keep your Google rankings or lose them overnight.
A small site of 20 to 30 pages takes about 6 to 8 hours of focused work, while a site under 50 pages typically needs one to two weeks from start to finish. The work itself is not hard. The risk is skipping the redirect step, publishing the new site before it is ready, or pointing the domain at a half built WordPress install while the old site still earns traffic.
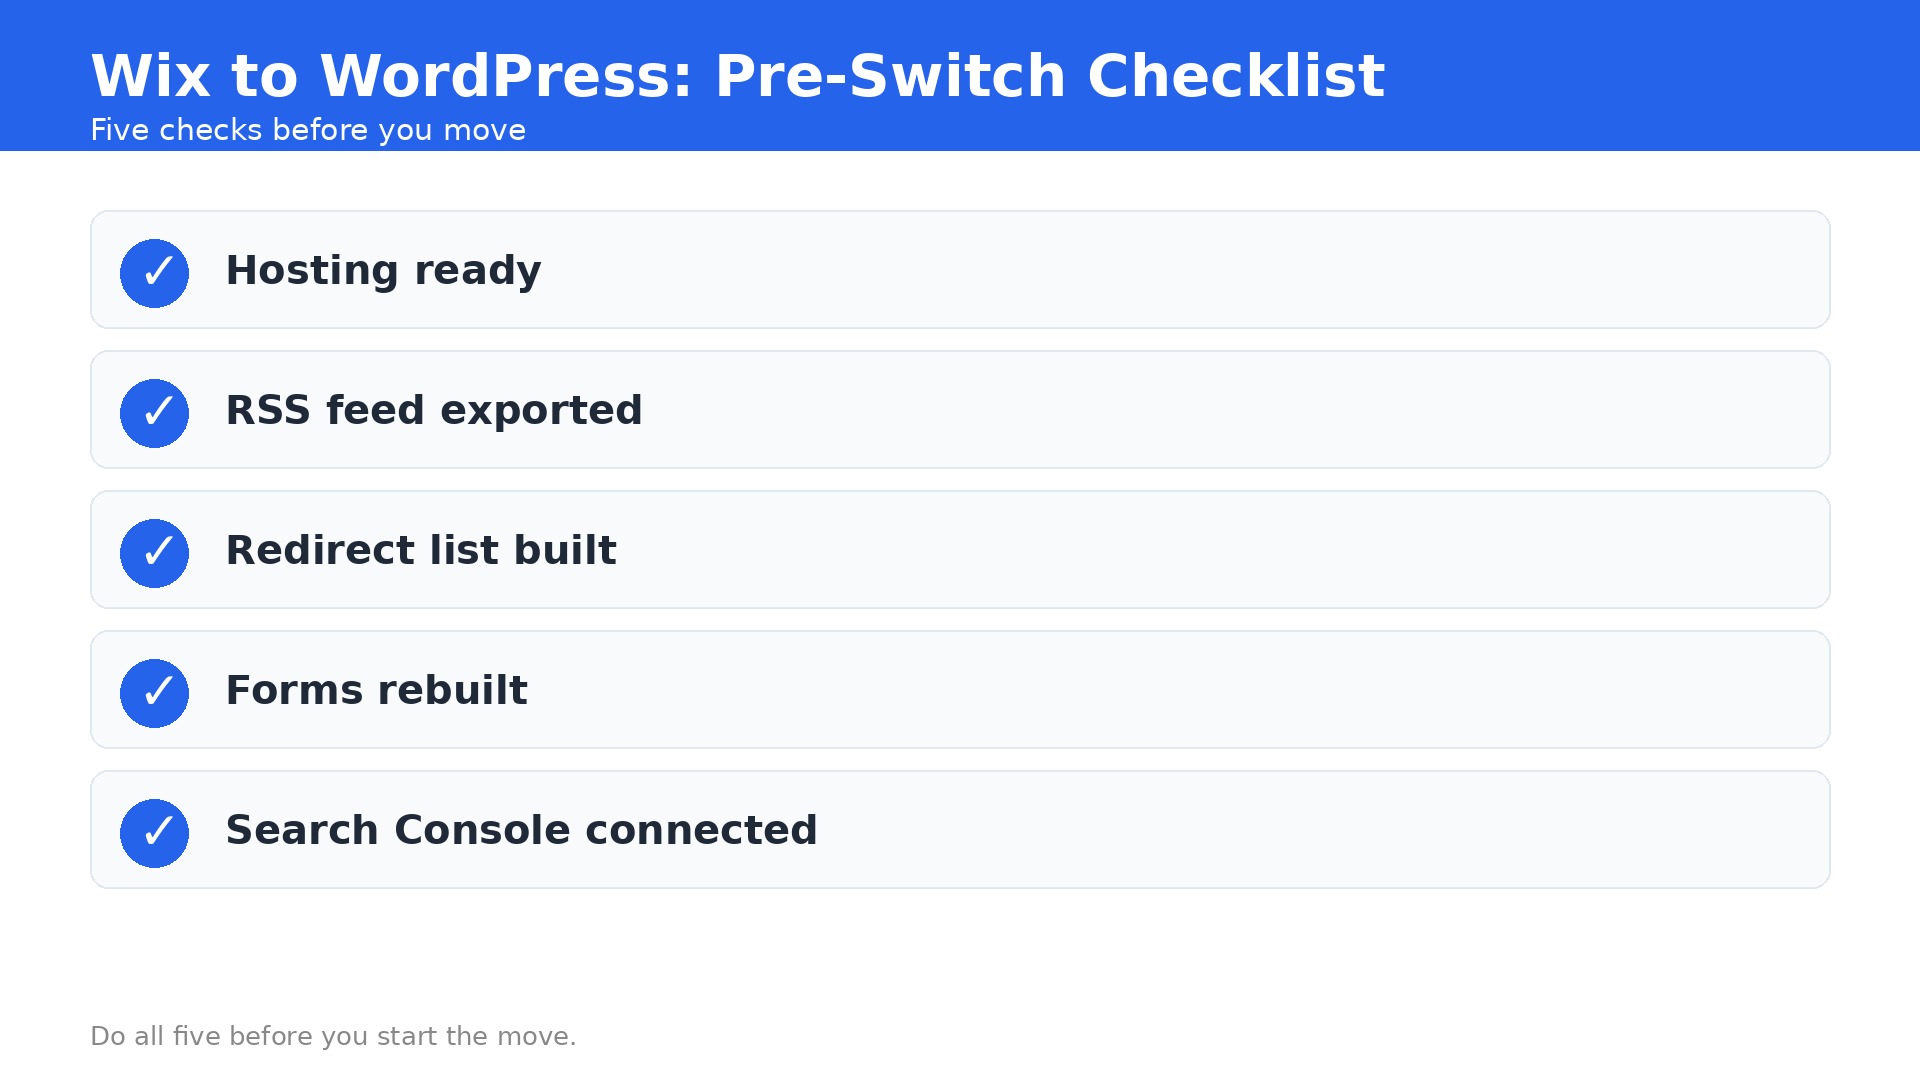
This guide walks through the whole move in eight steps, with a checklist up front, a table showing what transfers and what does not, and a timing plan you can follow over a weekend or two. Keep your Wix site live until the very end. Nothing here requires downtime if you build on staging first.
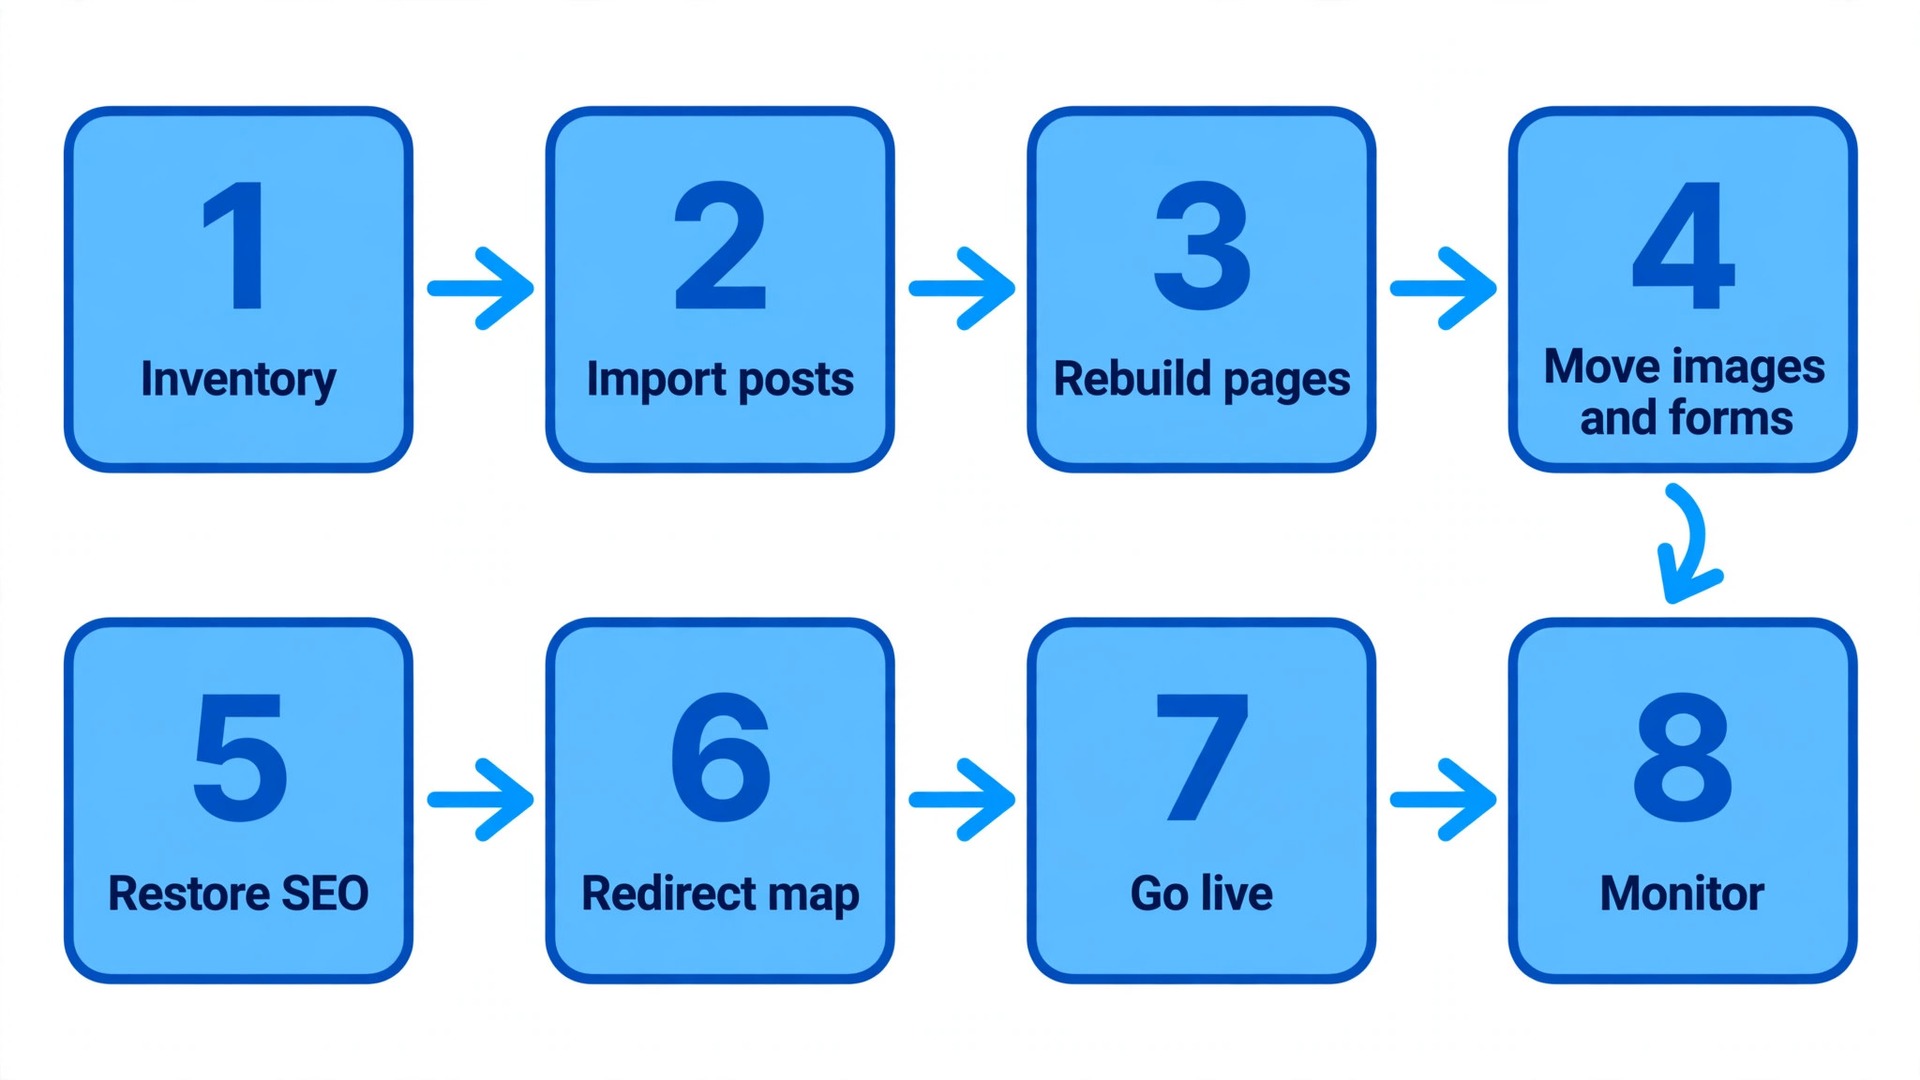
Switch Checklist
Do every item on this list before you touch a single setting. A switch done in the right order is calm. A switch done in a hurry is how rankings and sales get lost.
How to switch from Wix to WordPress safely starts with knowing what you own. Crawl the site, list every page, and save copies of everything that cannot be exported. That inventory becomes your redirect list later, and it is the document you will be glad you made.
- Export a full URL list from Google Search Console and your Wix sitemap, and save it as a spreadsheet.
- Note your top 10 traffic pages from Search Console, since those redirects matter most.
- Save copies of your logo, brand colors, fonts and every image you want to reuse.
- List every Wix app you rely on, such as bookings, forms, members, stores or newsletters.
- Check your domain registration date, since ICANN rules block transfers within 60 days of registration or a registrant change.
- Choose WordPress hosting and confirm it supports the traffic your site gets today.
- Create a staging copy of WordPress and block search engines from indexing it.
- Write down every form on the site and where its submissions should go after the move.
- Note your current SEO titles and meta descriptions for the top 20 pages.
- Back up your Wix content by copying page text into documents, since pages cannot be exported.
- Tell your team the go live date, and pick a quiet time with low traffic for the cutover.
- Lower your DNS TTL to 300 seconds 24 to 48 hours before cutover, so the change spreads fast.
What Moves and What Breaks
Set expectations before you learn how to switch from Wix to WordPress in practice. Some things move cleanly, some move with work, and some do not move at all. The table below is the honest version, based on what Wix actually lets you export in 2026.
Design never transfers. Neither do Wix apps, store settings or member accounts. Plan the move as a rebuild of the design with a transfer of the content, and the budget and timeline will make sense.
| Item | Transfers | What to do about it |
|---|---|---|
| Blog posts, newest 20 | Yes, through RSS | Import the feed at yoursite.com/blog-feed.xml, then check images and dates post by post |
| Older blog posts | No, manual only | Copy text and images by hand, or use a third party tool and verify every post |
| Static pages | No, rebuild | Recreate About, Services and Contact pages in WordPress from your saved copies |
| Design and theme | No, rebuild | Build the closest match in WordPress, or use the move as a redesign |
| Images and media | Partly | Use the Auto Upload Images plugin after import, then re-upload what is missing |
| SEO titles and descriptions | No, recreate | Copy your top 20 titles and descriptions into RankMath by hand |
| Contact forms | No, rebuild | Recreate each form in WordPress and test that submissions arrive |
| Store products | Partly, through CSV | Export the product CSV from Wix, then import into WooCommerce and check prices |
| Customer accounts | No | Customers create new accounts on WordPress, so warn them in advance |
| Domain name | Yes, transfer or point DNS | Transfer the domain or point DNS at the new host, respecting the 60 day rule |
| URLs and slugs | Partly | Match slugs where possible, then 301 redirect everything else |
| Backlinks | Yes, through redirects | A proper 301 passes roughly 90 to 99 percent of ranking power to the new URL |
One trap deserves a warning. Older Wix sites used hashbang URLs with hash and exclamation symbols, and standard redirects cannot always catch those. If your site has them, list them separately and test each one after the move. A missed redirect on a ranking page costs more to recover than the whole migration.
Step 1. Inventory the old site and buy hosting
Crawl your Wix site before anything changes. Use the free tier of Screaming Frog, which covers up to 500 URLs, or export the URL list from Google Search Console. Save every page, post and media URL into a spreadsheet. That list becomes the redirect list later, and every URL in it needs either a 301 redirect or a confirmed match on the new site.
While you have the data, note which pages bring traffic. Your top 10 pages deserve the most care, since a broken redirect there is visible in days. Also list every Wix app you rely on, such as bookings, forms, members or a store, and write down what each one does, because each one needs a WordPress replacement.
Now buy WordPress hosting that fits your traffic and install WordPress on it. Do not build on the live domain yet. Build on the staging domain or subdomain your host provides, while the Wix site keeps running as usual. That way nothing breaks for visitors while you work.
Set the permalink structure to post name in Settings, then Permalinks. Matching your URL structure to your old Wix slugs is half the redirect battle. A page called about-us should stay about-us on WordPress, so the redirect is unnecessary. Also tick the box in Settings, then Reading, that discourages search engines from indexing the staging site.
Step 2. Import your blog posts through the RSS feed
Wix publishes an RSS feed of your blog, usually at yoursite.com/blog-feed.xml. That feed carries your 20 most recent posts with titles, body text and dates. In WordPress, go to Tools, then Import, find RSS, install the importer when prompted, paste your feed URL and run it.
Check every imported post after the run. Titles and text usually arrive cleanly, but images often do not. Install the free Auto Upload Images plugin, then bulk edit and update the imported posts so images pull into the WordPress media library. Check dates too, since a wrong date can bury a post in the wrong archive.
For posts older than the newest 20, the feed will not help. Copy those by hand, or use a third party import tool and verify each post after it lands. Do not skip old posts that still earn traffic. Check Search Console first and move the ones that rank, even if the rest can wait.
Set categories to match your old blog structure while you are here. A clean category map now saves hours of fixing later, and it keeps the new blog organized for readers who browse by topic.
Step 3. Rebuild your pages manually
Pages cannot be exported from Wix, so rebuild them by hand. Open each Wix page, copy the text into a document, download the images, and recreate the page in WordPress. Start with the pages that earn traffic or sales, such as the home page, services, about and contact pages, then work through the rest.
Use the rebuild as a chance to improve. Shorten walls of text, add clear headings, and put the call to action where a visitor can see it without scrolling. A move is the one time you can fix years of small design problems without anyone noticing the site changed underneath them.
Keep the same slugs where possible. If the old page lived at yoursite.com/about-us, give the new page the same slug. Every slug you match is one redirect you do not need to build or test, and it keeps old links and bookmarks working without any extra work.
Check internal links as you rebuild. Links between old posts and pages still point at Wix URLs, and they need to point at the new WordPress URLs. Fix them now, while the content is fresh in your mind, rather than hunting broken links after launch.
Step 4. Move images and recreate forms
Images need care, because a post with missing images looks broken even when the text is perfect. After the RSS import, use Auto Upload Images to pull remote images into the media library. Then open your top 20 posts and check each image by eye. Re-upload anything that did not come across, and give files SEO friendly names before you upload them.
Add alt text to every important image while you are here. Alt text helps accessibility and search, and it is far easier to write now than to add later across a hundred posts. Keep it short and descriptive, naming what the image shows rather than stuffing keywords.
Recreate every form in WordPress. Contact forms, quote forms, booking forms and newsletter signups all need a WordPress replacement, and each one needs testing. Submit a test entry to every form and confirm it arrives where it should. A form that looks right but sends nothing is worse than no form at all.
Check file sizes too. Wix images are often large, and a WordPress site full of uncompressed images will load slowly. Compress images before upload, and keep the originals saved locally in case you need them later.
Step 5. Restore SEO titles, descriptions and structure
Your rankings depend on more than URLs. Recreate meta titles, descriptions, heading structure and image alt text for your top pages. RankMath can hold all of it, and its setup wizard walks through the basics. Copy your top 20 titles and descriptions from your pre switch notes, then write fresh ones for the rest.
Keep heading structure clean. One H1 per page, H2 headings for main sections, and H3 for subsections. A page that had three H1 headings on Wix should have one on WordPress. Search engines and screen readers both prefer a clear hierarchy, and it makes the page easier to scan for visitors too.
Recreate any schema markup that mattered, such as local business or FAQ schema, and check that your sitemap generates correctly in WordPress. Submit the new sitemap to Google Search Console once the site is live, and keep the old Wix sitemap in mind until Google has crawled the new one.
Do not copy meta descriptions word for word if they are weak. A move is a good time to write sharper ones, since a better description can lift clicks even when rankings stay the same. Keep them under 160 characters and honest about what the page offers.
Step 6. Build the 301 redirect map
This is the step that protects your traffic, so do not skip it. A proper 301 redirect passes roughly 90 to 99 percent of ranking power to the new page, which means search engines treat the WordPress URL as the rightful heir to the old one. Without redirects, every indexed Wix URL returns a 404 and your rankings reset.
Start with your URL spreadsheet from step one. For each old URL, write the matching new WordPress URL. Where you kept the same slug, no redirect is needed. Where the URL changed, you need a 301. Never send everything to the home page. A redirect to a page with the same content keeps rankings. A redirect to the home page looks like a dead end to Google and to visitors.
Install the free Redirection plugin in WordPress and enter each redirect before go live. Use 301 for permanent, never 302 for temporary, since a 302 tells search engines the move is not permanent. Test a sample of redirects against the staging domain before launch, and check the old hashbang URLs separately if your site has them.
Keep the list after launch. It is the document you will check when Search Console reports a 404, and it is the proof that every old URL was accounted for. A redirect list that is complete before launch saves weeks of fixing after it.
Step 7. Point the domain and go live
Lower your DNS TTL to 300 seconds 24 to 48 hours before cutover, so the change spreads in minutes rather than hours. Then point the domain DNS at your new WordPress host and wait for the SSL certificate to be issued. Most hosts issue it automatically, but check that the padlock appears before you announce the launch.
Remove the search engine discouragement in Settings, then Reading, so Google can index the new site. Flush any caching, including Cloudflare cache if you use it, and verify that the redirects are firing on the live domain. Visit several old URLs yourself and confirm each one lands on the right new page.
Keep the Wix site accessible for a short while if you can, since it holds your backup of the old content. Do not cancel it on launch day. Wait until the new site has run cleanly for at least two weeks and Search Console shows the new URLs indexed without a spike in errors.
Announce the move to your team and your regular visitors only after you have tested the live site. Check the home page, the contact form, the phone number and the main call to action on a phone as well as a desktop. Most visitors will see the new site on mobile first, so it must work there before anywhere else.
Step 8. Watch Search Console for two weeks
Submit the new sitemap in Google Search Console on launch day, and check the coverage report daily for the first week. Look for spikes in 404 errors or indexing problems, and add redirects where needed. Google own site move guidance notes that rankings can fluctuate for a while after URLs change, and thorough redirects keep the swing much smaller.
Check the top 10 traffic pages individually. Confirm each one is indexed at the new URL, ranking near its old position, and receiving clicks. If a page drops sharply, check its redirect, its title and its content first. Most post move drops come from a missed redirect or a changed title, and both are quick to fix.
Monitor site speed and forms for the first two weeks as well. A new WordPress install can be slower than Wix if images are uncompressed or plugins conflict, and a form that worked on staging can fail on live if an email setting differs. Fix speed and form issues in the first week, while traffic is still finding the new site.
After two weeks of clean reports, you can cancel the Wix plan. Keep your URL spreadsheet, your redirect list and your content backups saved locally. They are the record of the move, and they make any future change far easier than starting from scratch again.
How to switch from Wix to WordPress on a realistic timeline
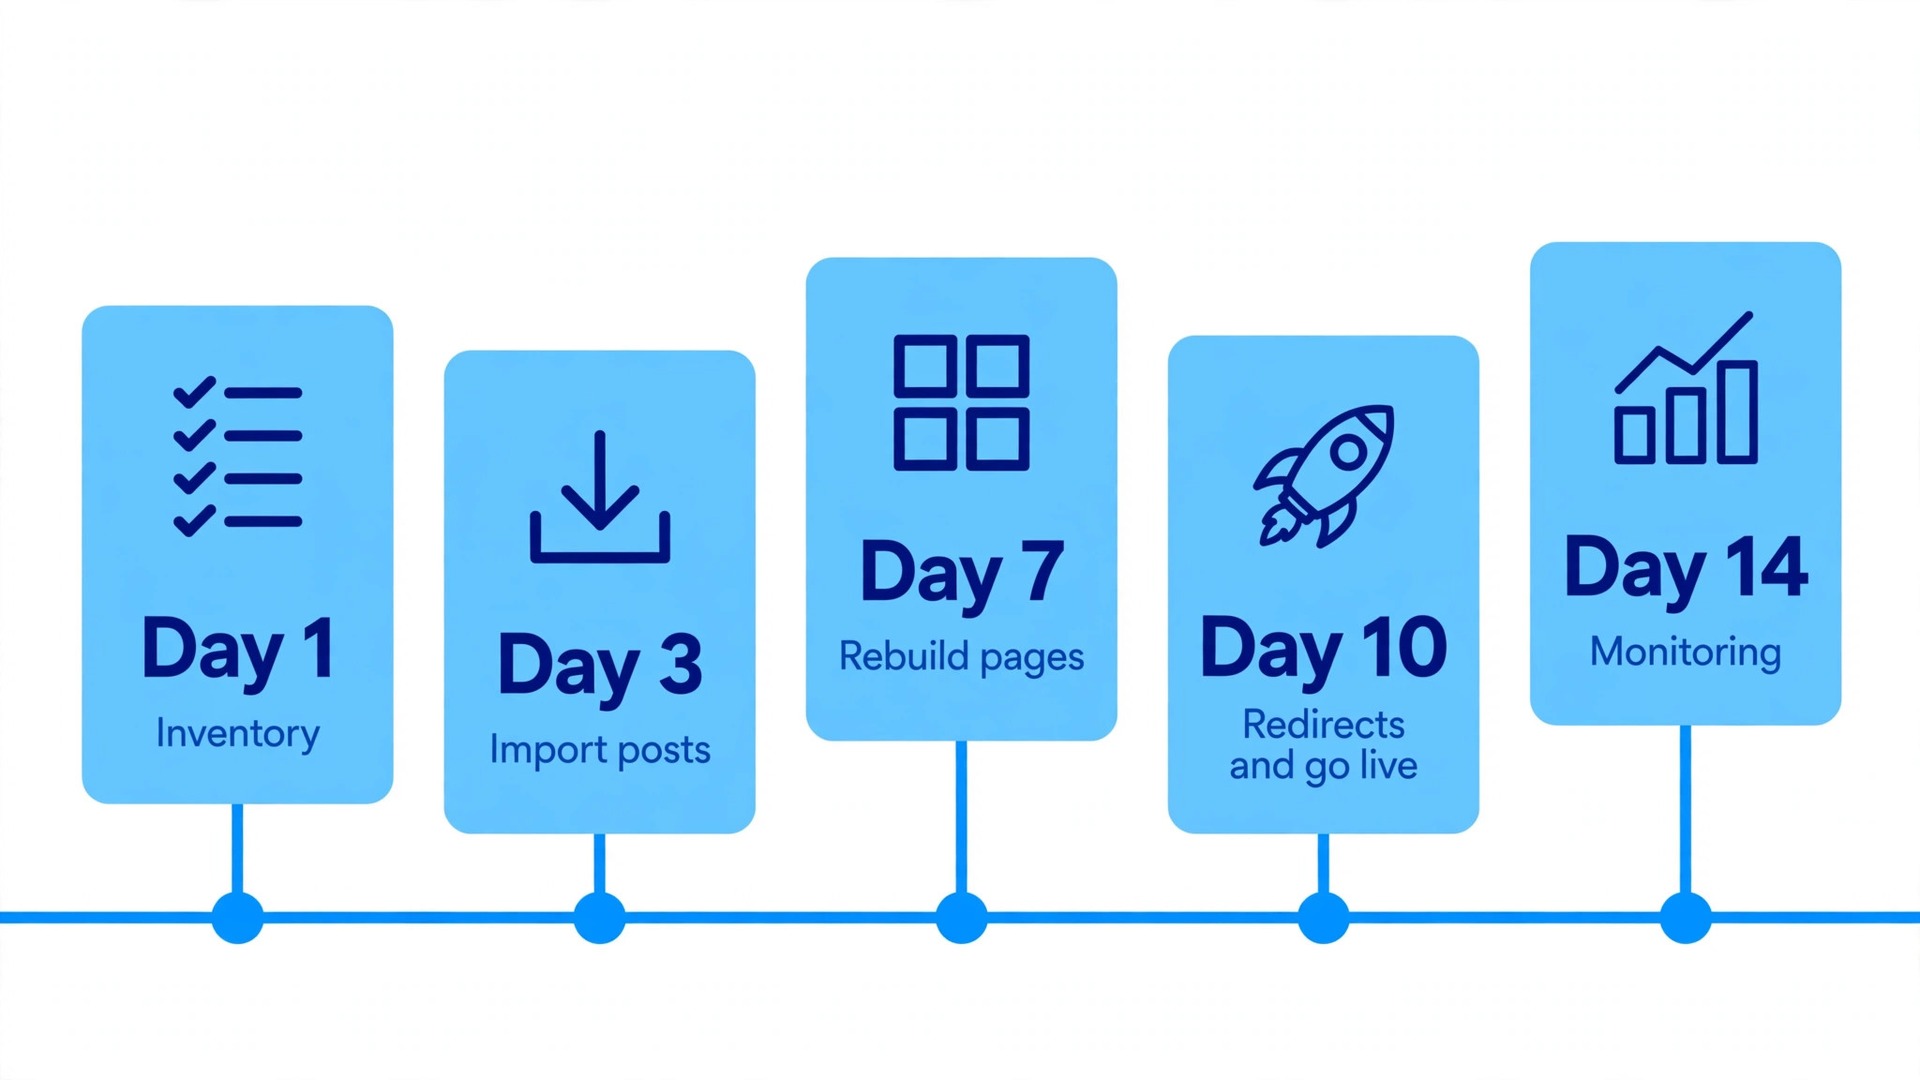
A small site fits in a weekend when you know how to switch from Wix to WordPress step by step. A larger one needs two weeks. Use this plan to pace the work, and keep the Wix site live until the last row is done.
| Phase | Time to allow | Who does it |
|---|---|---|
| Inventory and hosting | 1 to 2 hours | You, before anything changes |
| WordPress setup and staging | 1 hour | You, or your host support |
| Blog import through RSS | 1 to 2 hours | You, plus checking time |
| Page rebuild | 3 to 5 hours for 20 pages | You, or a freelancer |
| Images, forms and SEO | 2 to 4 hours | You |
| Redirect map | 1 to 2 hours | You, using the URL spreadsheet |
| Domain cutover | 1 hour, plus DNS wait | You, at a quiet time |
| Monitoring after launch | 30 minutes a day for 2 weeks | You, in Search Console |
Common mistakes that cost rankings
The most common mistake is redirecting every old URL to the new home page. That tells Google the content is gone, and rankings follow the content, not the domain. Redirect each old page to its matching new page, and only use the home page for URLs that truly have no match.
The second mistake is launching before the redirects are built. Once the domain points at WordPress, old URLs start returning 404 errors immediately, and every day without redirects is a day of lost traffic. Build the redirects on staging, test them, and only then point the domain.
The third mistake is forgetting the Wix store, bookings or member areas. Those features do not export, and a store that goes live without products, payment or shipping settings will lose sales on day one. Rebuild commerce features before cutover, test a full purchase, and warn customers about new accounts.
The fourth mistake is cancelling Wix on launch day. Keep it for two weeks as a backup and as a reference for content you may have missed. The monthly cost is small compared with rebuilding a page you deleted too soon.
What Switching Costs
WordPress hosting for a small business site costs roughly 5 to 30 dollars a month, depending on traffic and support. A domain transfer is usually free or under 15 dollars, and the Redirection plugin, Auto Upload Images and RankMath all have free versions that cover this move. That puts the cash cost of a careful switch under 50 dollars in the first month.
The real cost is time. Budget 6 to 8 hours for a 20 to 30 page site, or one to two weeks for a site under 50 pages with a store or bookings. A freelancer can do the same work, typically for a few hundred dollars, which is worth it when the site earns real revenue and downtime is not an option.
Keep the Wix plan running during the move, since cancelling early removes your backup. The overlap of one month of Wix plus one month of WordPress hosting is the cheapest insurance in the whole project.
After launch, what to check each day
Check Search Console every morning for the first week. Look at the coverage report for 404 errors, indexing problems and pages that dropped out. A single missing redirect can show up as dozens of errors, so fix the redirect first and watch the errors fall the next day.
Check your top 10 traffic pages individually. Open each one at the new URL, confirm it loads fast, and check its ranking with a quick search. A page that lost its title or its main image will tell you quickly if you look at it rather than trusting a report.
Test the contact form and the phone number daily for the first week. A form that worked on staging can fail on live if an email setting differs, and a missing phone number on mobile costs enquiries. Submit a test entry yourself each morning until you trust it.
Watch site speed on a phone. A new WordPress install can be slower than Wix if images are uncompressed or plugins conflict. Use a free speed test each day for the first week, compress any image that is slowing a page, and remove any plugin you do not need.
Answer every visitor message quickly in the first two weeks. Some visitors will arrive on an old bookmark or an old link and find something unexpected. A fast helpful reply turns a confused visitor into a customer, while silence turns them into a lost one.
After two weeks of clean reports, write a short note about what changed. Save the redirect list, the URL spreadsheet and the new sitemap in one folder. That folder is the record of the move, and it makes the next change, whether a redesign or a new page, far easier than starting from scratch.
One last check before you cancel Wix
Open the old Wix site one final time and compare it page by page with the new WordPress site. Check the home page, the services page, the about page and the contact page first, then work through the blog. A page that exists on Wix and not on WordPress is easy to miss, and a visitor who follows an old link to it will find nothing.
Confirm that no form, booking link or store button still points at Wix. Search the new site for the old domain and for any leftover Wix address, and fix every hit. A single missed link can send a customer to a site you are about to cancel, so this check is worth an hour of careful clicking.
The Final Pick
Moving from Wix to WordPress is a rebuild, not a button press, and it rewards patience. Anyone who follows how to switch from Wix to WordPress in the order above will keep their rankings and their sanity. Inventory first, build on staging, import the newest 20 posts through RSS, rebuild pages by hand, and build the redirect list before you point the domain. Do those steps in order and your rankings will survive the move.
The payoff is control. WordPress gives you ownership of your content, your SEO, your plugins and your costs, with no platform deciding what you can export. For a small business planning to grow, that control is worth a weekend of careful work.
Frequently Asked Questions
Can I move my Wix site to WordPress without losing SEO?
Yes. The core of how to switch from Wix to WordPress without losing SEO is 301 redirects for every old URL, with slugs matched where possible. A proper 301 passes roughly 90 to 99 percent of ranking power to the new page. Skip the redirects and your rankings reset, so build the redirect list before you point the domain.
How long does it take to switch from Wix to WordPress?
A small site of 20 to 30 pages takes about 6 to 8 hours of focused work when you know how to switch from Wix to WordPress and follow the steps in order. A site under 50 pages typically needs one to two weeks, including rebuild, redirects and monitoring. Build on staging first, and keep the Wix site live until the new site has run cleanly for two weeks.
Does Wix let me export my whole site?
No. Wix exports only your 20 most recent blog posts through the RSS feed. Pages, design, images, store settings and member accounts cannot be exported. Plan the move as a rebuild of the design with a transfer of the content, and budget time for manual page rebuilds.
What happens to my domain when I switch?
You can transfer the domain to a new registrar or simply point its DNS at your new WordPress host. ICANN rules block transfers within 60 days of registration or a registrant change, so check your dates first. Lower DNS TTL to 300 seconds 24 to 48 hours before cutover.
Will my Wix store products move to WordPress?
Products can move through a CSV export into WooCommerce, but store settings, customer accounts and some discounts do not transfer. Rebuild payment, shipping and tax settings in WooCommerce, test a full purchase on staging, and warn customers that they will need new accounts.
Should I cancel Wix right after launching on WordPress?
No. Keep Wix running for at least two weeks after launch as a backup and a reference for missed content. Check Search Console daily for 404 errors, fix any missing redirects, and cancel only when the new site shows clean reports and stable rankings.