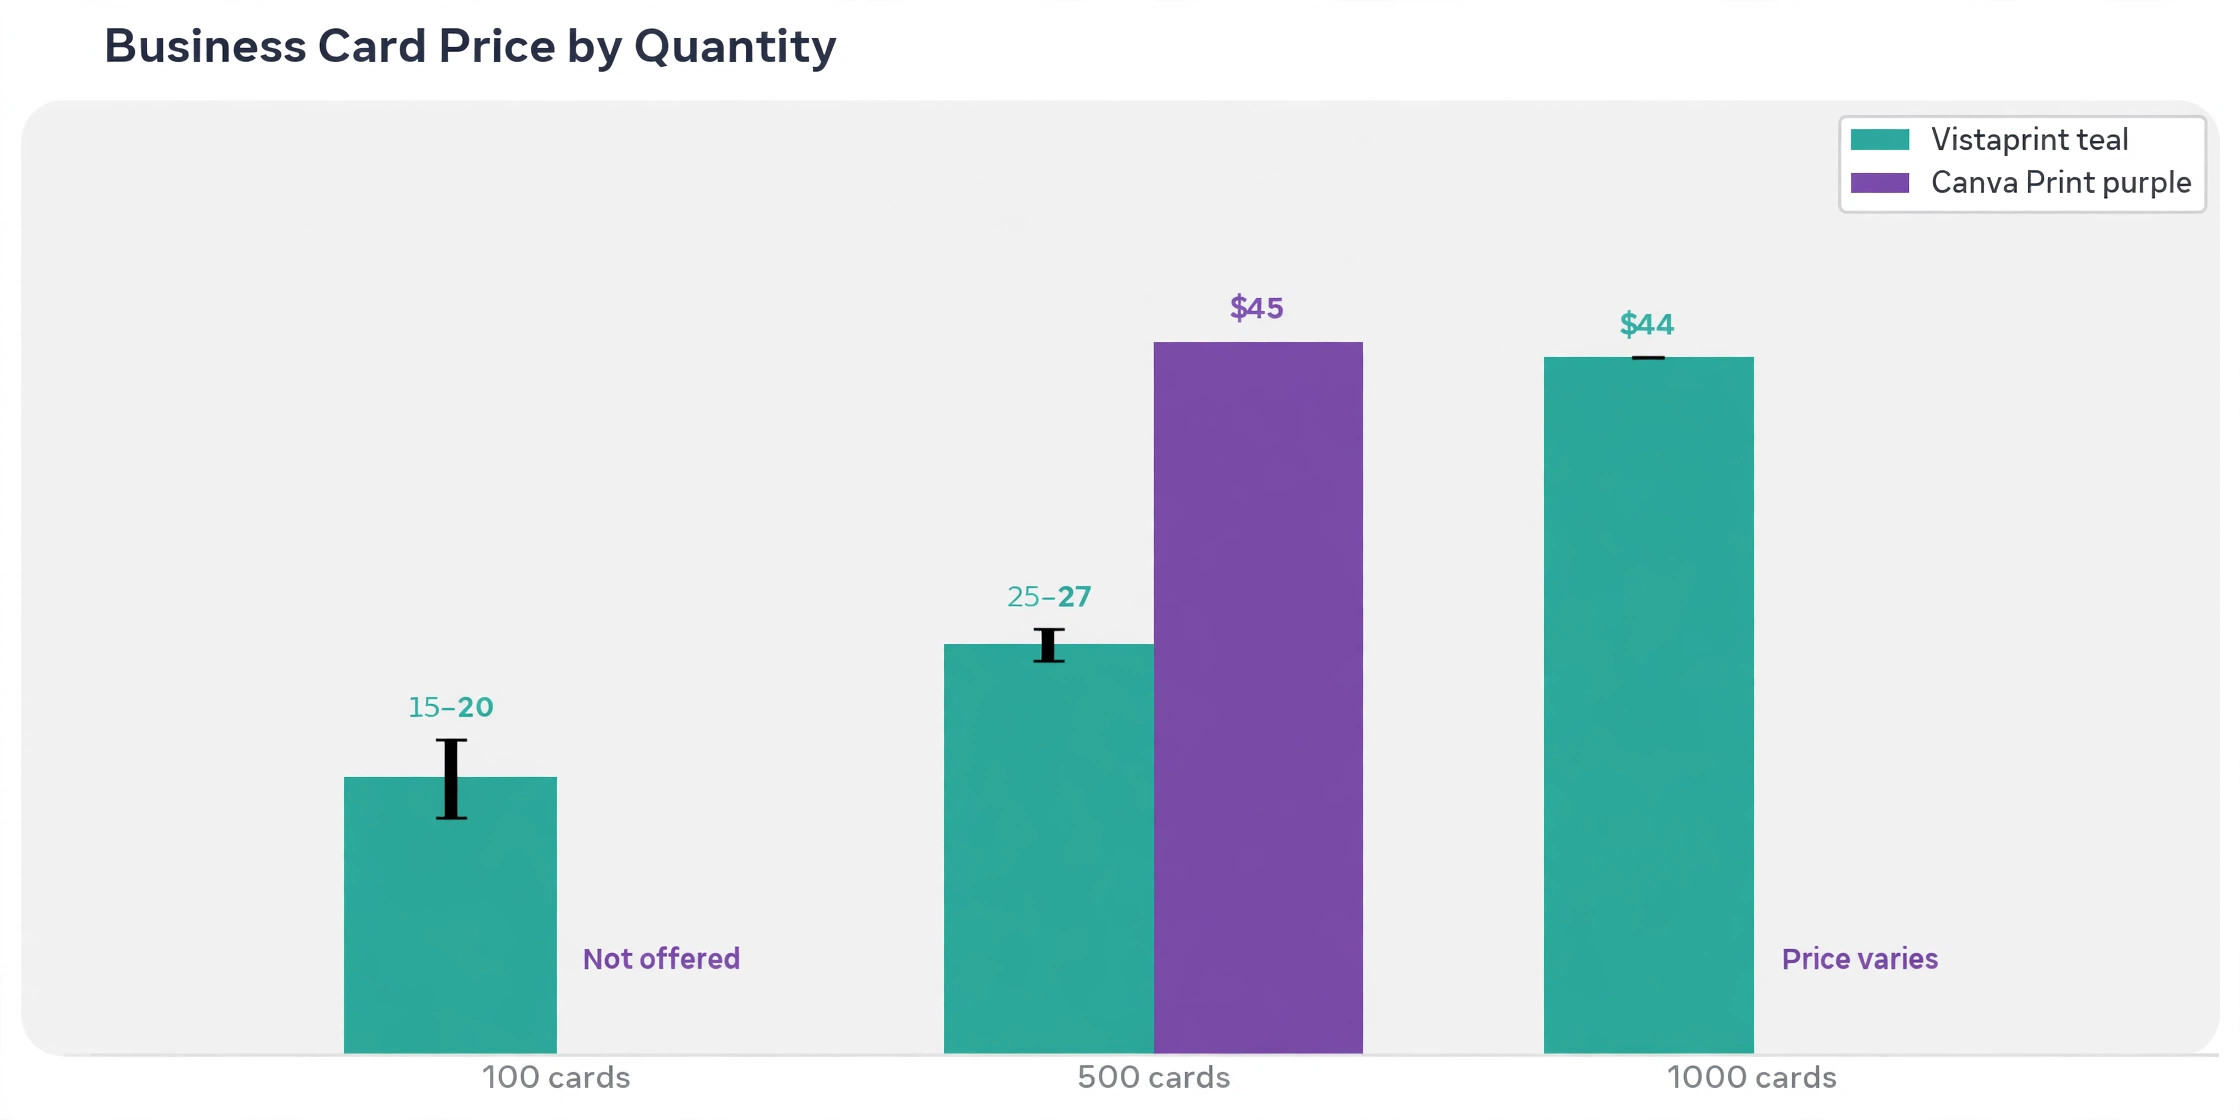
Canva prints 500 standard business cards for 45 dollars. Vistaprint prints 100 standard cards for about 15 to 20 dollars, and 500 for about 25 to 27 dollars, before shipping and promotions. That price gap is why so many small businesses design in Canva and print with Vistaprint, and the switch from Canva to Vistaprint business cards is mostly a file problem, not a design problem. Get the size, the bleed, the safe zone and the export right, and the card that arrives looks exactly like the card on your screen.
This guide walks through the whole move in eight steps, with the exact dimensions Vistaprint publishes, the export settings that matter, a cost comparison and a migration checklist you can follow in order. Vistaprint has printed business cards since 1995, and its size guide is the authority for every number below.
Switch from Canva to Vistaprint Business Cards at a Glance
The table below compares the two services on the points that decide whether the switch is worth it for you.
| Point | Canva Print | Vistaprint |
|---|---|---|
| What it is | Design tool with built in printing | Print specialist with design tools |
| Minimum order | Varies by product, 500 for the cheapest standard cards | 100 front side only cards |
| Standard 100 cards | Not offered at the cheapest tier | About 15 to 20 dollars before shipping |
| Standard 500 cards | 45 dollars for matte, square corners | About 25 to 27 dollars before shipping |
| Paper and finish | Standard paper, matte finish at the low price | Matte, glossy, premium and specialty stocks |
| Design control | Full control in the Canva editor | Upload your file or use Vistaprint templates |
| Proofing | Preview in the editor before ordering | Online proof before the print run |
| Best for | One stop design and print | Cheapest print, widest paper choice |
The switch makes sense when you want more paper choices, a smaller first order or a lower price at volume. It makes less sense when you order rarely and value the convenience of designing and printing in one place, because Canva Print removes the whole file preparation step. The rest of this guide assumes you have decided to switch, and it focuses on doing it without a reprint.
Why Switch, and When to Stay
The strongest reason to switch is price at volume. Vistaprint charges about 25 to 27 dollars for 500 standard cards, against 45 dollars for the same quantity from Canva Print, and the gap grows when you add a second side or a premium stock, because Vistaprint prices each option separately. The second reason is choice, because Vistaprint offers matte, glossy, premium and specialty stocks with rounded corners and other shapes, while Canva Print keeps the range simple. The third reason is the minimum order, because Vistaprint lets you order 100 cards to test a design, while the cheapest Canva Print tier starts at 500.
There are good reasons to stay with Canva Print as well. The first is convenience, because the design, the proof and the order all happen in one account, with no file export and no upload. The second is brand consistency, because a card designed in Canva uses the same Brand Kit, fonts and colors as every other asset in the account. The third is small orders of one design, because reprinting 500 cards you already have is rarely the cheapest option. If you print cards once a year and you value simplicity over price, stay with Canva. If you print often, hand out cards at events or want a specific paper, the switch pays for itself in the first order.
The Sizes and Specs You Need
Every failed switch comes back to one of four numbers, and they are all published in the Vistaprint size guide. Learn them before you open Canva, because resizing a finished design is slower than starting at the right size.
| Measurement | Size | In pixels at 300 DPI |
|---|---|---|
| Finished card, the trim size | 3.5 by 2 inches | 1050 by 600 |
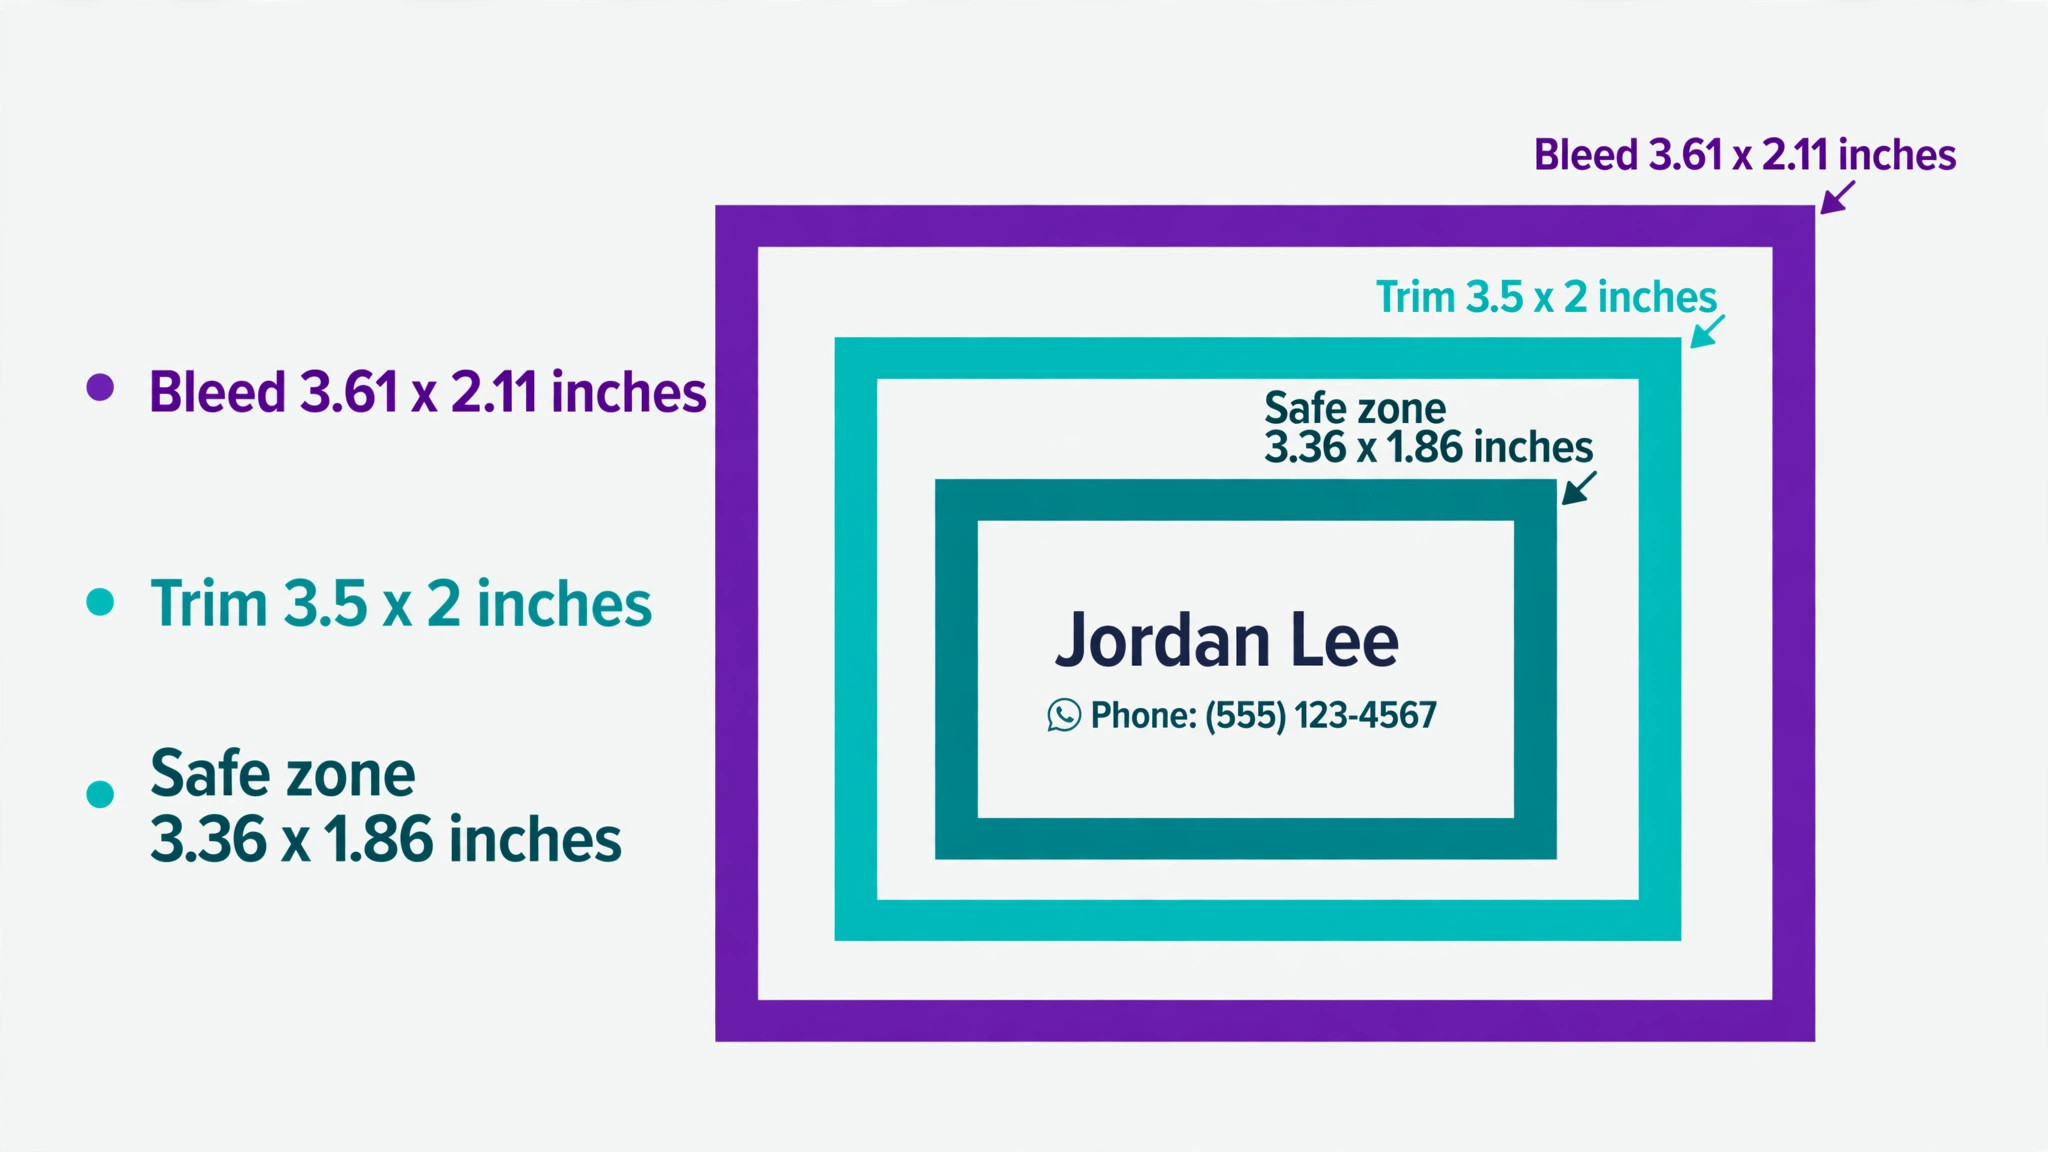
| Full bleed file | 3.61 by 2.11 inches | 1083 by 633 |
| Safe printing zone | 3.36 by 1.86 inches | 1008 by 558 |
| Bleed added on each side | About 0.055 inches | About 17 pixels |
Bleed is the extra artwork that extends past the trim edge, so a background color or photo can print all the way to the edge without a thin white border if the cut shifts slightly. The safe zone is the area inside the trim where important text, logos and QR codes must stay, because anything outside it risks being trimmed. The rule is simple, and it is the same on every printer. Backgrounds go to the bleed edge, text stays inside the safe zone, and nothing important sits in the gap between them.
Resolution matters as much as size. Vistaprint asks for images at 300 DPI at the final printed size, and a logo pulled from a website at 72 DPI will look soft on the finished card. Check every photo and logo before you export, and replace anything that looks blurry at full size on screen, because print makes a soft image softer. Color matters too, because Canva works in RGB while printers print in CMYK, and bright screen colors print duller than they look. Canva Pro can export in CMYK, and the steps below cover that.
How to Switch from Canva to Vistaprint Business Cards in 8 Steps
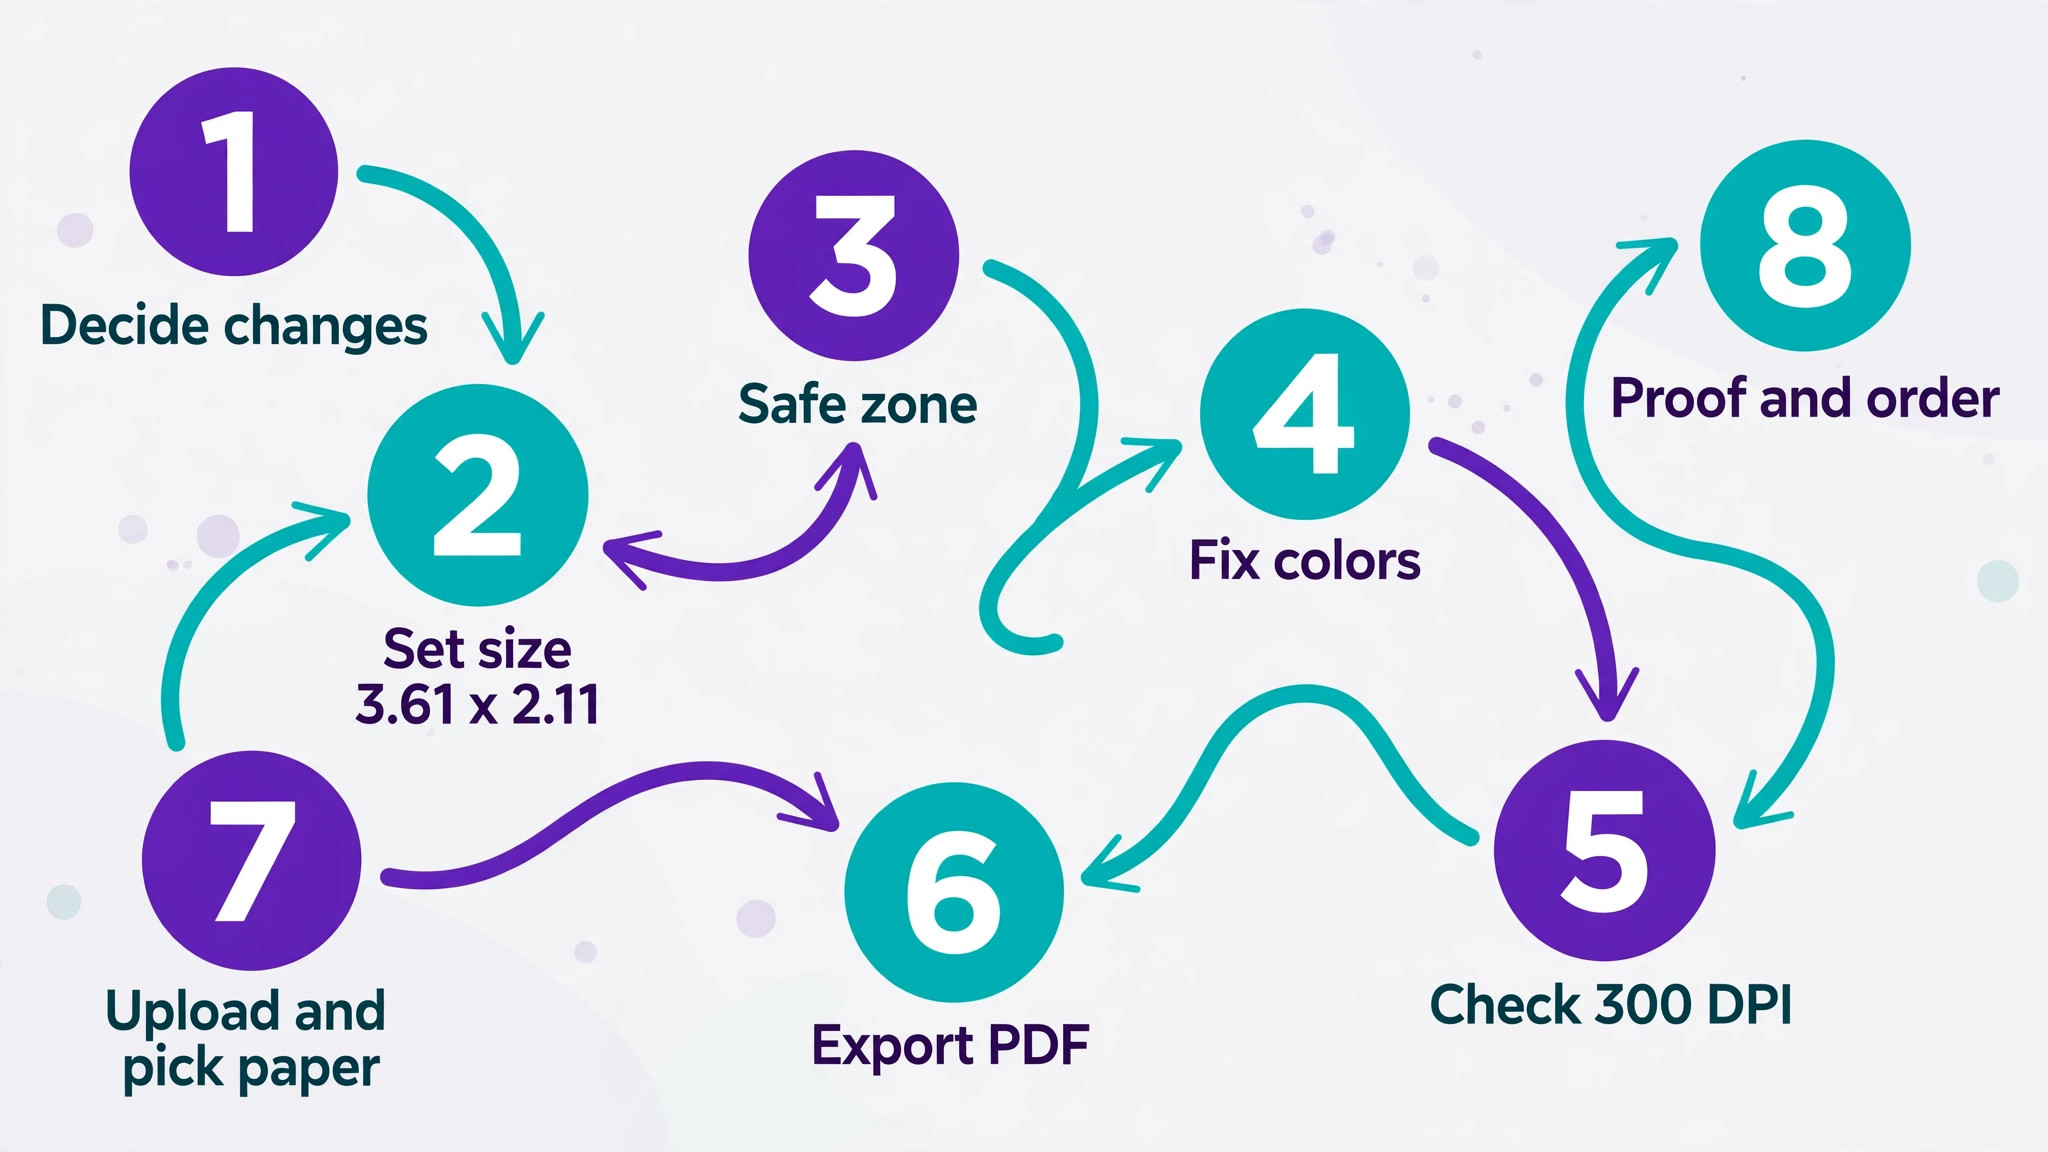
The eight steps below run in order, and they take about thirty minutes for a card that already exists in Canva. Do not skip the proof step, because it is the only chance to catch a mistake before the print run.
Step 1. Decide What Changes
Start by deciding whether the card keeps its current design or gets a redesign. A straight move keeps the same layout, colors and text, and it only needs the size and export fixes in the steps below. A redesign is a chance to fix the problems the old card had, like text too close to the edge or a logo that prints too small, but it adds a design round to the job. Either way, write down the paper, the finish and the quantity you want before you start, because those choices decide the price you compare at the end.
If you redesign, fix the three flaws that show up on most old cards. Put your name and your job in the largest type, make the phone number and email easy to find, and add a QR code that points to your website or booking page instead of a third line of text. A card has one job, which is to get the reader to contact you, so cut anything that does not help that job.
Step 2. Set Up the Right Size in Canva
Open Canva and create a custom design at 3.61 by 2.11 inches, which is the full bleed size Vistaprint asks for. Do not use the standard business card template at 3.5 by 2 inches, because a file at trim size cannot bleed without redesign, and the printer will either add a white border or stretch your design. Then open File, open View settings and turn on Show print bleed, so Canva displays the bleed area and the safe zone while you work. If your card already exists at the wrong size, use the resize tool on Canva Pro to change it, and check every element after the resize, because text and images can shift.
The free plan cannot resize a design after you create it, so starting at the right size matters more on free than on Pro. If your card already exists at 3.5 by 2 inches on a free account, copy the design into a new custom size canvas instead of trying to stretch it, and rebuild the background first so the bleed is correct before you move the text.
Step 3. Move Text into the Safe Zone
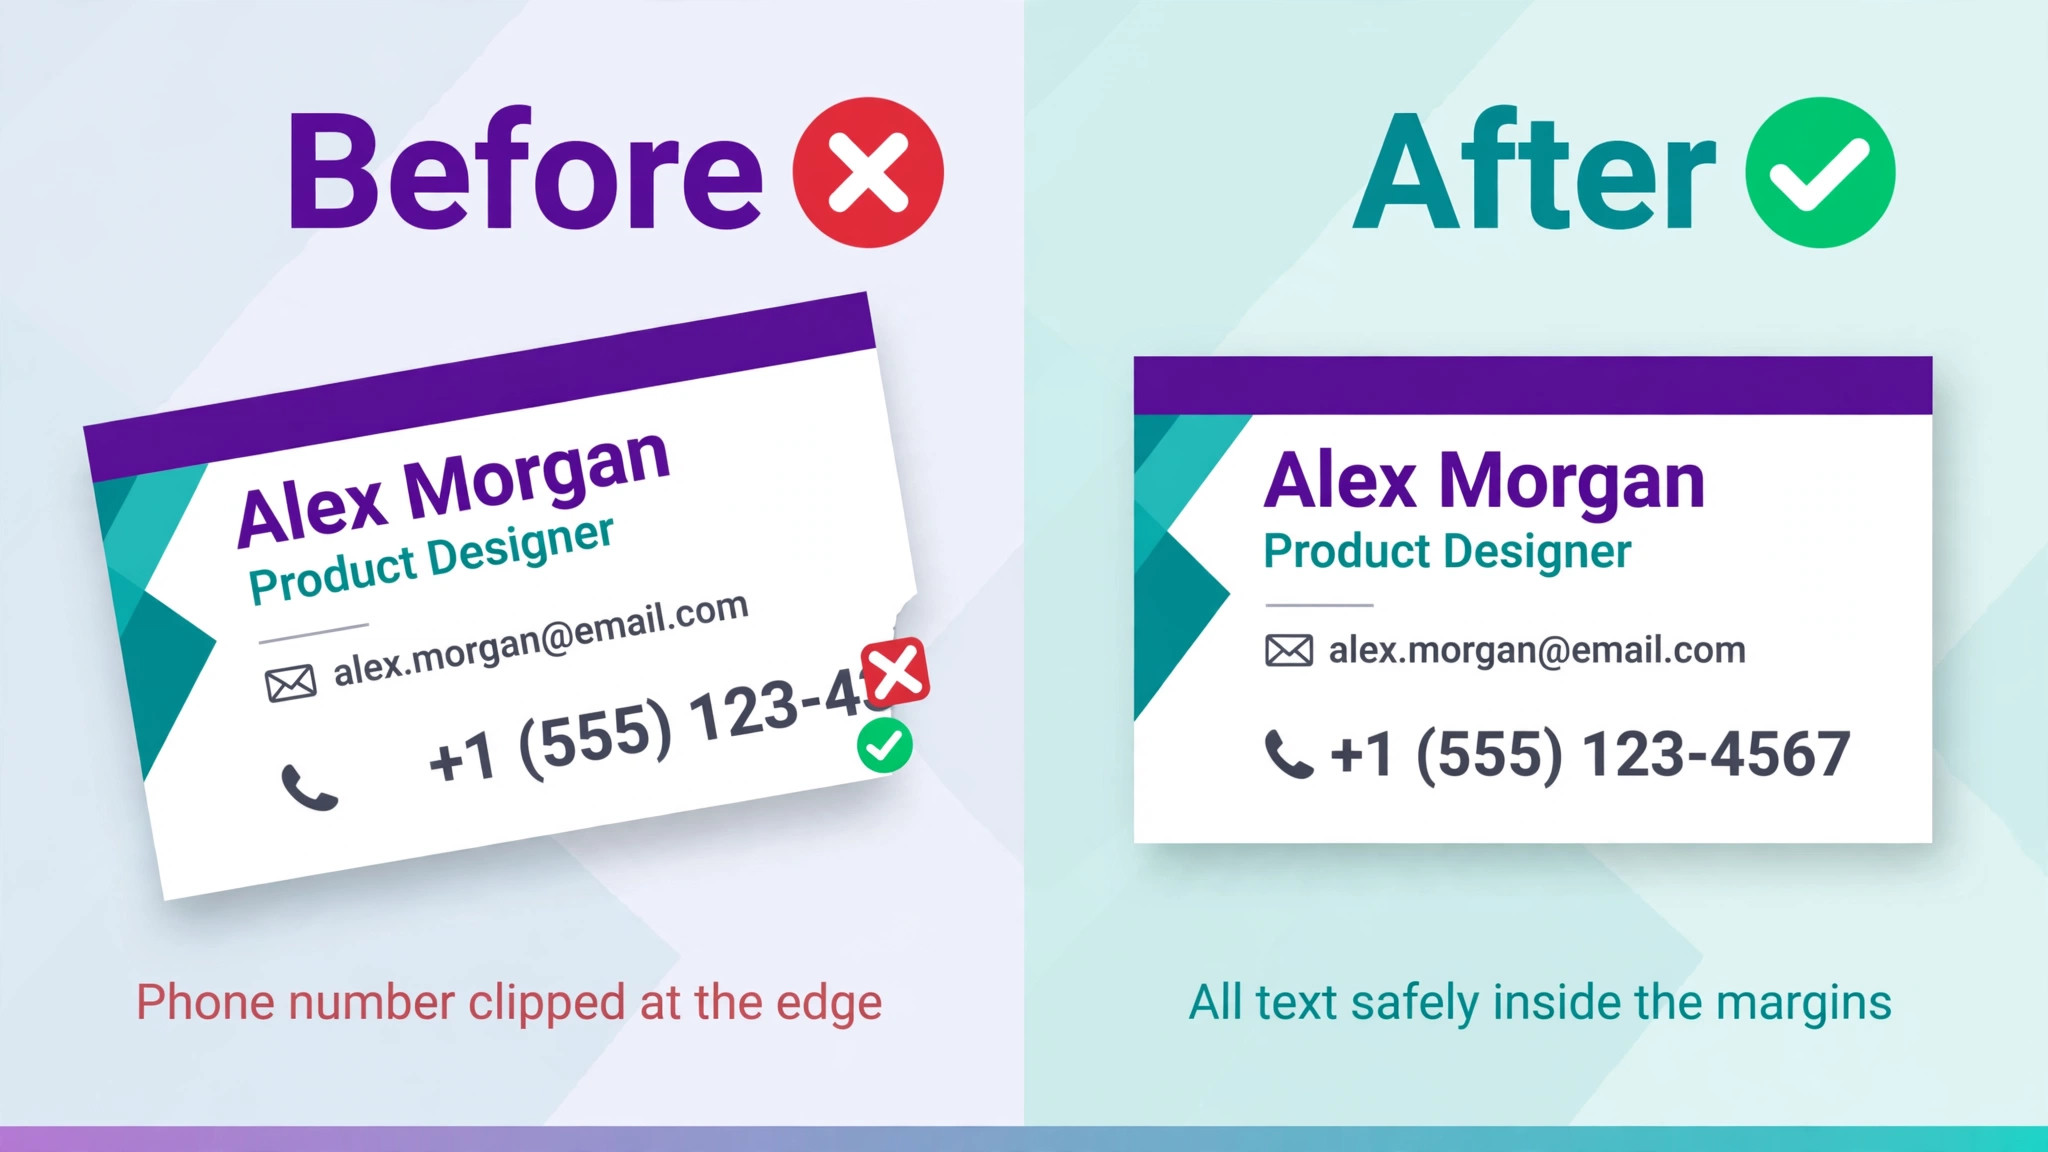
The safe zone on a Vistaprint standard card is 3.36 by 1.86 inches, or 1008 by 558 pixels at 300 DPI. Move every piece of important text, every logo and every QR code inside that zone, and leave the space between the safe zone and the trim edge empty. Pay special attention to phone numbers and email addresses, because a single digit clipped by the trim makes the whole card useless. Extend backgrounds, photos and color blocks all the way to the bleed edge, so the design prints to the edge of the card without a white border.
A QR code needs a quiet zone of empty space around it, so keep it well inside the safe zone and test it with a phone camera before you export. The back of the card needs the same treatment, because a back side with text near the edge will clip just as easily as the front. Check both sides at full size on screen before you move on.
Step 4. Fix Colors for Print
Canva works in RGB, and Vistaprint prints in CMYK, so bright screen colors will print duller than they look. If you have Canva Pro, export the file in CMYK, which is the single most useful Pro feature for this switch. If you use the free plan, you can only export in RGB, so check the proof carefully and expect rich blues and bright greens to shift the most. Avoid tiny text in a light color on a dark background, because it fills in during printing, and avoid large areas of solid black made from all four inks, because plain black prints cleaner.
The cheapest way to test your colors is a small order. Print 100 cards on the cheapest standard stock first, and check the colors in daylight before you order 500 on a premium stock. A test run costs about 15 to 20 dollars, and it answers the color question with a real card in your hand instead of a guess on screen.
Step 5. Check Images at 300 DPI
Every photo and logo on the card should be 300 DPI at the size it prints. A logo downloaded from a website is usually 72 DPI, and it will look soft on the finished card even if it looks sharp on screen. Replace low resolution images with high resolution versions, and use a vector logo or an SVG file where you have one, because vectors print sharp at any size. Zoom the design to full size on screen and look at each image in turn, because print makes a soft image softer, and a blurry logo on a business card is worse than no logo at all.
Ask the person who made your logo for the vector file, usually an SVG, EPS or AI file, because that is the version made for print. If the logo only exists as a small PNG from a website, ask for a new export at a larger size rather than stretching the small file, because stretching a low resolution image only makes the blur bigger.
Step 6. Export a Print Ready PDF
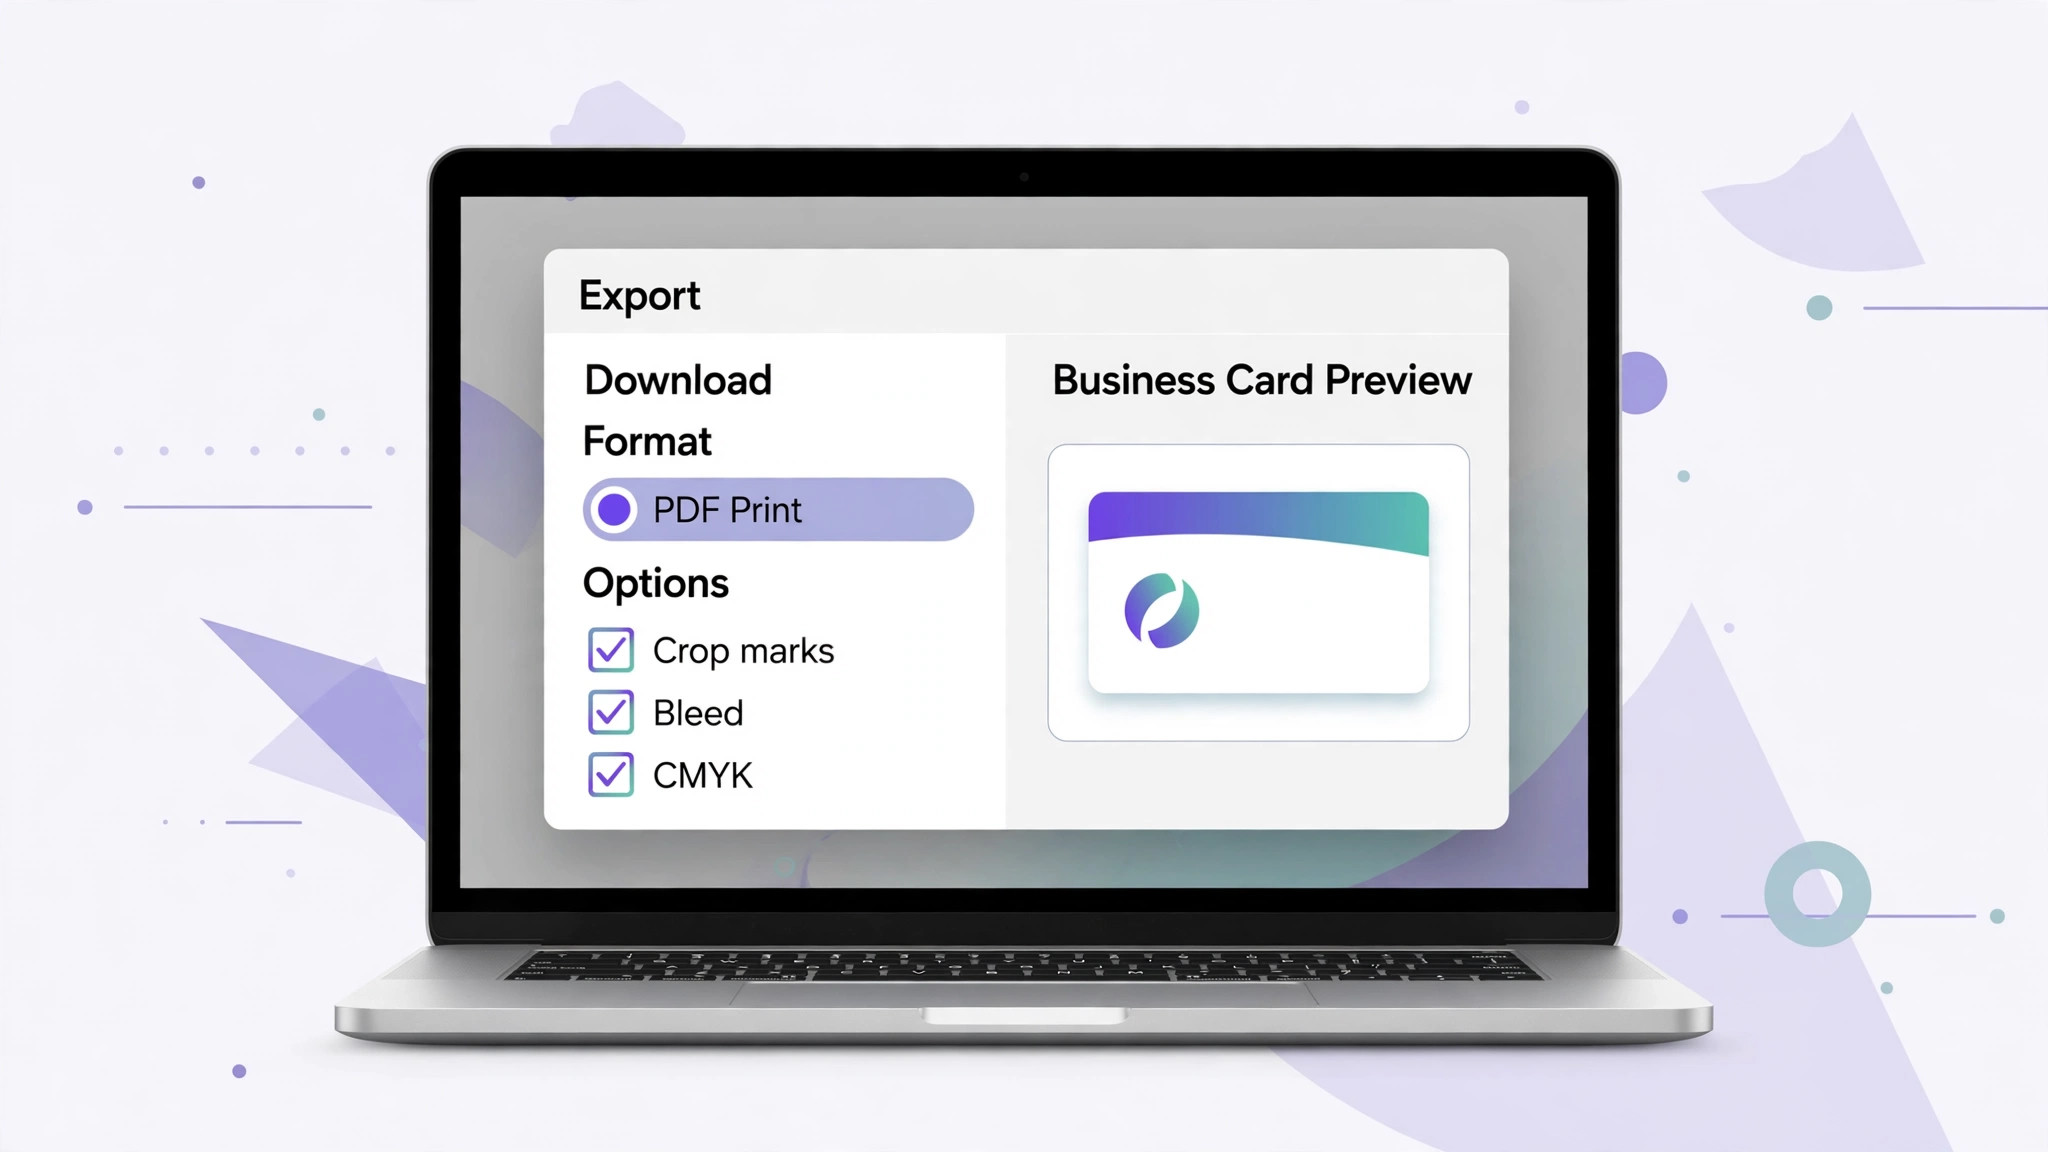
Go to Share, select Download, choose PDF and select the Print option. Under Advanced Settings, check the Crop marks and bleed box, so the exported file includes the bleed and the cut marks the printer needs. If you have Pro, choose the CMYK color profile as well. Then open the exported PDF and check it before you upload it, because this is the file the printer will use. Confirm the page size reads 3.61 by 2.11 inches, confirm the backgrounds reach the bleed edge, and confirm no text sits outside the safe zone.
Name the file clearly, with the card name and the date in the file name, and keep a copy outside Canva, because the exported PDF is the print record for this order. Open the PDF on a different device if you can, because a second screen catches errors your eyes skipped on the first, and a phone screen is a good test for whether the text is readable at real size.
Step 7. Upload to Vistaprint and Pick Paper and Finish
Go to Vistaprint, choose business cards, and upload your PDF as a full design rather than starting from a template. Pick the paper and finish first, because the price changes with each option, and standard matte or glossy is the cheapest start. Premium adds textured, pearl or soft touch stocks for a few dollars more per hundred, and a second side adds about 7 dollars per hundred. Rounded corners add about 7 dollars per hundred as well. Choose the quantity after the paper, because the per card price falls fast with volume, and 500 cards often costs little more than 250.
Check the delivery estimate before you pay, because production time and shipping time are separate, and the total is what matters for an event. Standard production plus standard shipping usually takes several business days, while express options cost more and arrive faster. If the cards are for a specific date, order a week earlier than you think you need to, because a proof correction adds days to the timeline.
Step 8. Proof, Order and Check the First Box
Vistaprint shows an online proof before the print run, and this is the step that saves you from a reprint. Check the proof at full size, read every word, check the phone number digit by digit, and confirm the back of the card if you ordered a second side. Then place the order, and when the box arrives, check the first card before you hand any out. Look for clipped text, dull colors and soft images, and keep one card as a reference for the next order, so you can compare the reprint against the original.
If the proof shows a problem, fix it in Canva and export a fresh PDF rather than approving a proof you hope will turn out fine. A proof correction costs minutes, while a reprint costs the full order price plus another round of shipping. Keep the order number and the proof with the PDF file, because the next reorder goes faster when you can point to the exact file that printed correctly.
Your Migration Checklist
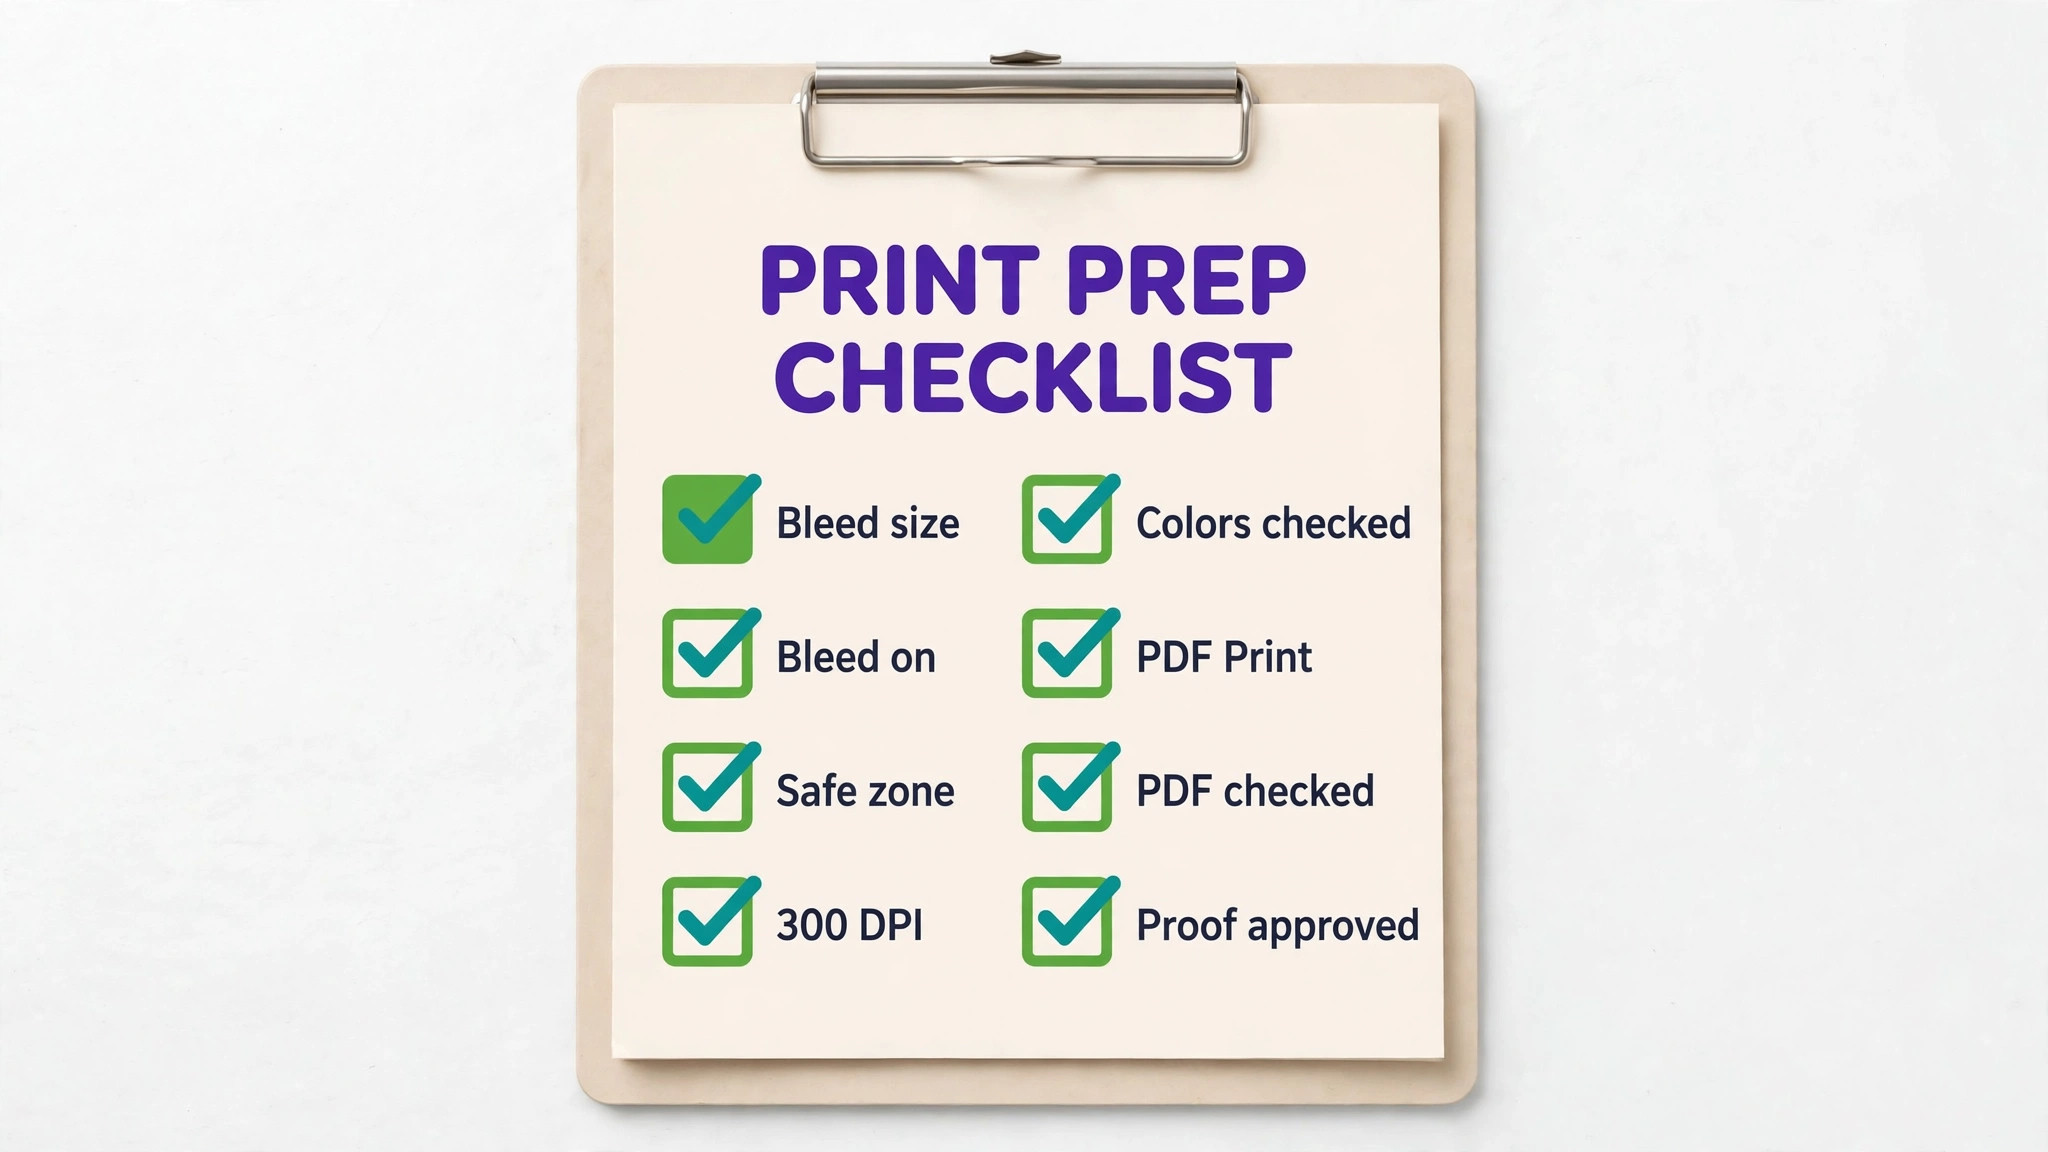
Run through the checklist below before you upload anything to Vistaprint, and treat a missing item as a reason to stop and fix it.
- Card is set up at 3.61 by 2.11 inches, the full bleed size.
- Print bleed is turned on in Canva, and backgrounds reach the bleed edge.
- All text, logos and QR codes sit inside the 3.36 by 1.86 inch safe zone.
- Every image is 300 DPI at the size it prints, and the logo is high resolution.
- Colors are checked for print, and CMYK export is used where available.
- File is exported as PDF Print with crop marks and bleed turned on.
- Exported PDF is opened and checked, and the page size reads 3.61 by 2.11 inches.
- Paper, finish, quantity and second side are chosen, and the online proof is approved.
What to Do When the Proof Looks Wrong
A proof that looks wrong is the system working, and a switch from Canva to Vistaprint business cards is the moment most file mistakes surface. Fix the file in Canva and export again, because approving a bad proof only moves the problem to the print run, where it costs real money.
When the colors look dull, the cause is usually RGB to CMYK conversion, and the fix is a CMYK export on Canva Pro or a test run of 100 cards on the cheapest stock to see the real result. When text is clipped, the cause is the safe zone, so move the text inward and export again. When an image looks blurry, replace it with a 300 DPI version or a vector file, because no export setting can sharpen a low resolution image. When the page size reads wrong, the canvas was set up at trim size, so rebuild it at 3.61 by 2.11 inches rather than stretching the old file.
When the back of the card looks upside down, check the preview orientation before you approve, because the back prints in the orientation shown on the proof.
What It Costs
Vistaprint prices change with promotions, so the figures below are the list prices reported in late 2026, before shipping and before any discount code. Prices are the least stable part of a switch from Canva to Vistaprint business cards, because Vistaprint runs frequent promotions, so the checkout price is often lower than the list price, and the price you pay depends on the day you order.
| Order | Vistaprint standard | Vistaprint premium | Canva Print standard |
|---|---|---|---|
| 100 cards | About 15 to 20 dollars | About 24 dollars | Not offered at the cheapest tier |
| 500 cards | About 25 to 27 dollars | About 45 dollars and up | 45 dollars |
| 1000 cards | About 44 dollars | About 80 dollars and up | Price varies by paper |
A second side adds about 7 dollars per hundred, and rounded corners add about 7 dollars per hundred, so a premium two sided card with rounded corners costs far more than the headline price. Shipping is extra, and express delivery adds more again, so compare the total at checkout rather than the card price alone. The honest comparison is the price per card at the quantity you actually order, including shipping, and on that measure Vistaprint wins at 500 cards and Canva Print wins on convenience for a single small order.
Paper and Finish, Explained
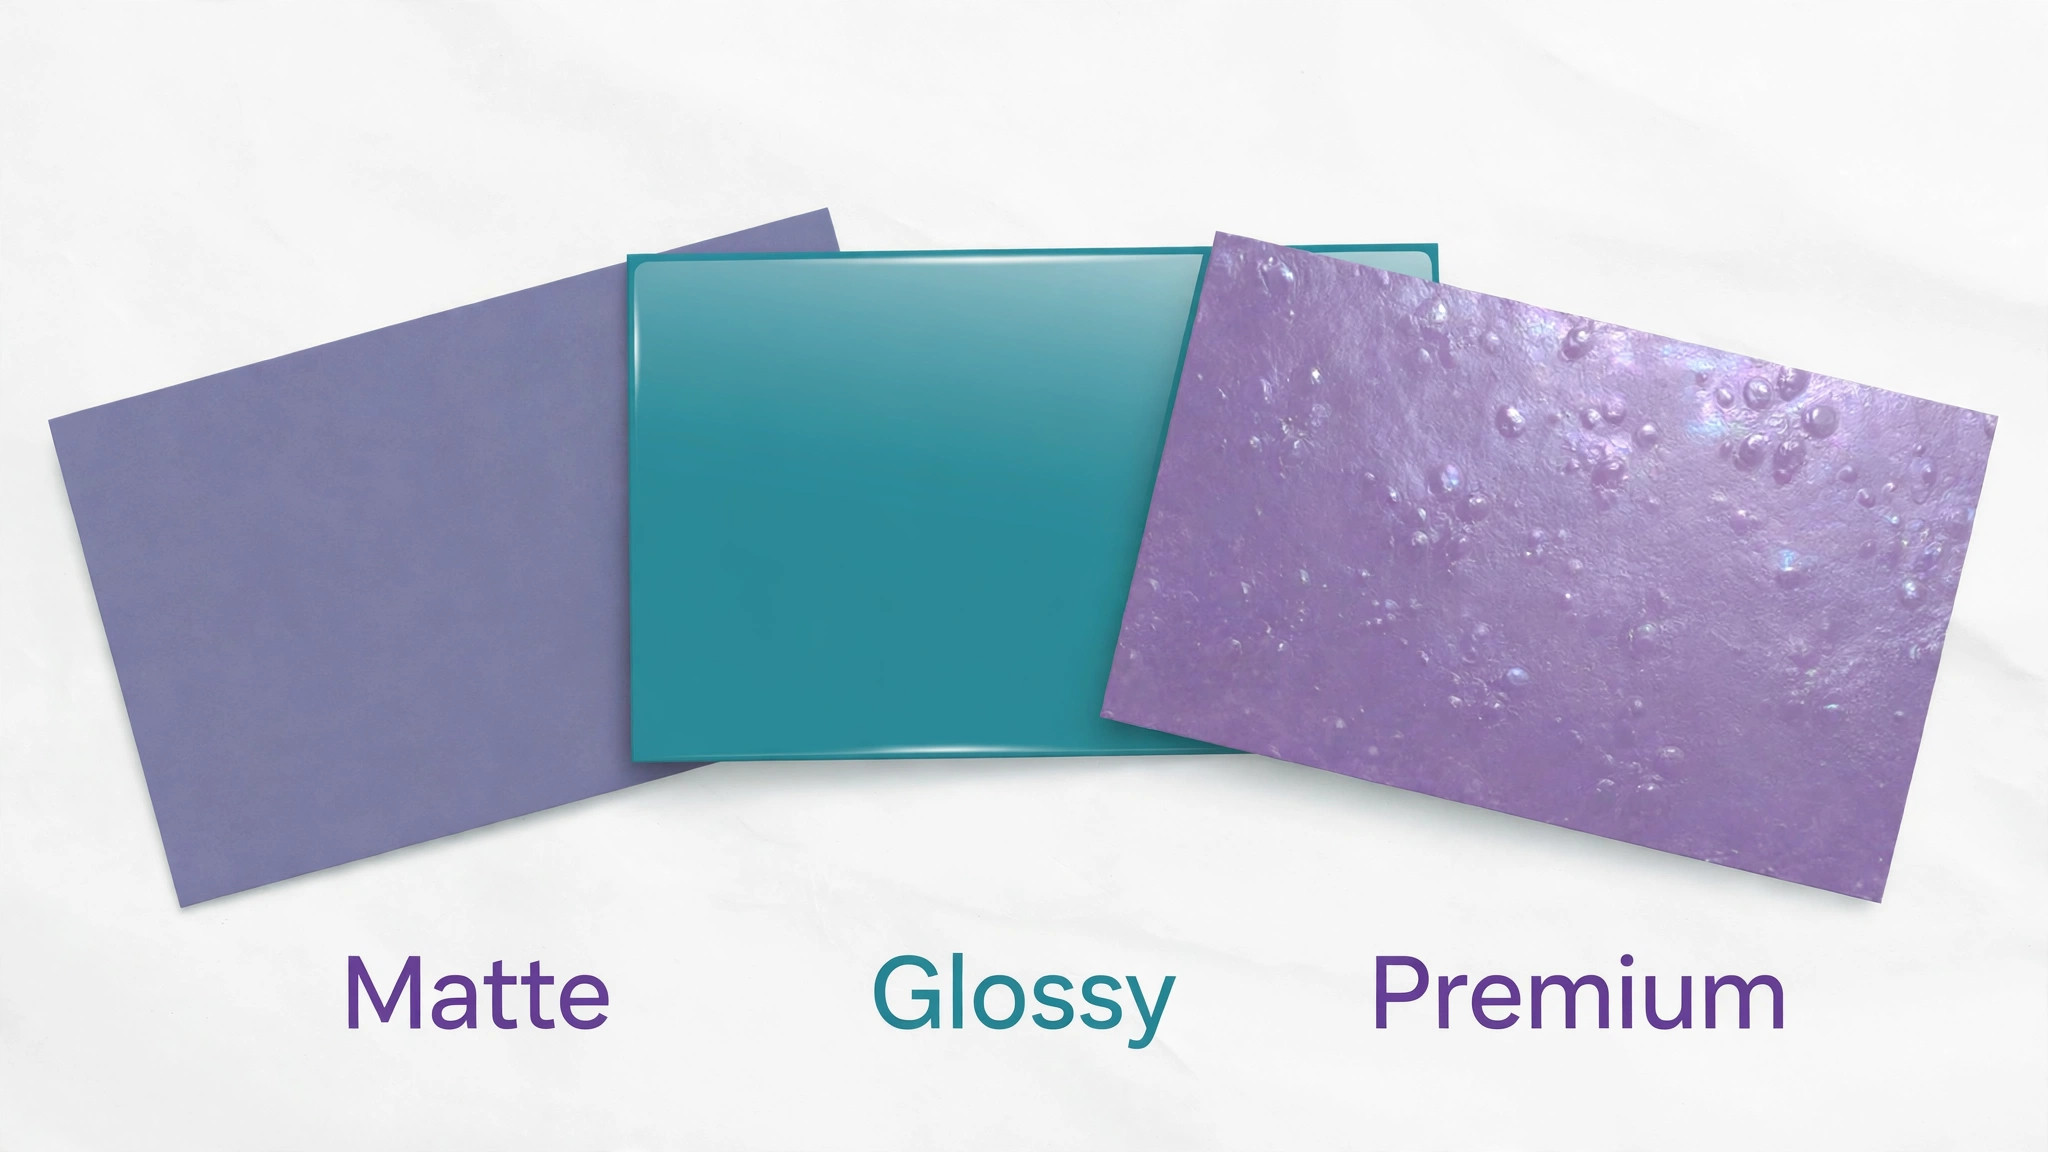
Paper is the part of the switch most people ignore, and it is the part the recipient notices first. Standard Vistaprint cards come in matte or glossy, and either one is fine for a first order. Matte feels professional and takes a pen, which matters if you write notes on your own cards, while glossy makes photos pop and resists fingerprints. Premium stocks add a textured, pearl or soft touch finish for a few dollars more per hundred, and the soft touch finish in particular makes a card feel expensive in the hand.
The finish changes the price and the feel, but it does not change the file, so you can order the same design on two stocks and compare them in person. If you hand out cards at events, order the premium stock once and see whether it is worth the difference, because the cost per card is still only a few cents. If you leave cards in shops and cafes, the standard stock is the right choice, because volume matters more than feel when the card is picked up and read once.
Reordering and Keeping the Design
Once the first order is right, a switch from Canva to Vistaprint business cards pays off on every reorder, because the file already exists and the proof is already approved. Vistaprint keeps your uploaded design on the account for reorders, while Canva keeps the source file you can edit, so keep both in place and keep the exported PDF with them. When a detail changes, like a phone number or a job title, edit the design in Canva, export a fresh PDF with the same settings, and upload it as a new version rather than editing the old proof.
Name each version with the date it was printed, and keep one card from every order as a reference, because the reference card is how you spot a color shift or a paper change on the next run. A reorder takes minutes when the file is organized, and it takes an afternoon when you have to rebuild the card from a screenshot of the old one.
Common Mistakes
The most common mistake is uploading a file at trim size, 3.5 by 2 inches, with no bleed, because the printer cannot add bleed to a finished design, and the result is either a white border or a stretched image. The second mistake is text outside the safe zone, because a phone number clipped by the trim makes the card useless, and it is the error that causes the most reprints. The third mistake is exporting in RGB on the free plan and expecting the colors to match the screen, because bright blues and greens always print duller than they look.
The fourth mistake is a low resolution logo, because a 72 DPI image from a website looks sharp on screen and soft on paper. The fifth mistake is ordering before checking the proof, because the proof is the only chance to catch a typo, a wrong number or a missing back side. The sixth mistake is ordering 100 cards when you need 500, because the price per card falls so fast with volume that the larger order is often the cheaper decision. A switch from Canva to Vistaprint business cards fails on files, not on design, so check the file before you blame the printer.
Frequently Asked Questions
Can I upload a Canva design to Vistaprint?
Yes. Design the card in Canva at 3.61 by 2.11 inches, turn on print bleed, move all text inside the safe zone, and export it as PDF Print with crop marks and bleed turned on. Then upload that PDF to Vistaprint as a full design. The upload takes a minute, and Vistaprint shows an online proof before the print run, so you can check the file before you pay.
What size should a Canva business card be for Vistaprint?
Create a custom design at 3.61 by 2.11 inches, which is the full bleed size Vistaprint asks for, or 1083 by 633 pixels at 300 DPI. The finished card trims to 3.5 by 2 inches, and the safe zone for text and logos is 3.36 by 1.86 inches. Do not use the standard Canva template at 3.5 by 2 inches, because a file at trim size cannot bleed without redesign.
Does Vistaprint print Canva designs in CMYK?
Vistaprint prints in CMYK, and Canva Pro can export a PDF in CMYK, which is the best combination for color accuracy. The free plan exports in RGB only, so the colors will shift slightly in print, with bright blues and greens changing the most. Check the online proof carefully when you export in RGB, and expect the printed card to look slightly duller than the screen version.
How much do Vistaprint business cards cost?
Standard cards start at about 15 to 20 dollars for 100 before shipping, and about 25 to 27 dollars for 500, with premium stocks starting at about 24 dollars for 100. A second side adds about 7 dollars per hundred, and rounded corners add about 7 dollars per hundred. Vistaprint runs frequent promotions, so the checkout price is often lower than the list price, and shipping is extra.
Is Canva Print or Vistaprint cheaper for business cards?
Vistaprint is cheaper at volume, with 500 standard cards at about 25 to 27 dollars against 45 dollars from Canva Print, and it offers more paper choices and a smaller minimum order of 100 cards. Canva Print is cheaper in time rather than money, because the design and the order happen in one place with no file export. Pick Vistaprint for price and choice, and Canva Print for convenience.
How long does Vistaprint take to print business cards?
Turnaround depends on the paper, the quantity and the shipping speed you choose, and Vistaprint shows the delivery estimate at checkout before you pay. Standard production plus standard shipping usually takes several business days, and express options are available for a higher price. Order early for an event, because a reprint for a file mistake takes as long as the first order.
Your Move to Vistaprint, in Short
A switch from Canva to Vistaprint business cards comes down to four numbers and one export setting. Set the card up at 3.61 by 2.11 inches, keep text inside the 3.36 by 1.86 inch safe zone, use 300 DPI images, export a PDF Print with crop marks and bleed, and check the online proof before you order. Do that, and the card that arrives looks like the card on your screen, at a lower price per card than Canva Print and on the paper of your choice. Skip any one of those steps, and the reprint costs more than the saving.